How to Add Your Exchange Server Mailbox in Outlook for Mac?
89
0
·
2025/04/03
·
3 mins read
☕
WriterShelf™ is a unique multiple pen name blogging and forum platform. Protect relationships and your privacy. Take your writing in new directions. ** Join WriterShelf**
WriterShelf™ is an open writing platform. The views, information and opinions in this article are those of the author.
Article info
Categories:
⟩
⟩
Tags:
Total: 667 words
Like
or Dislike
More to explore


Microsoft Outlook for Mac is a powerful client for managing your emails, calendars, and contacts. If your organization uses Microsoft Exchange Server, adding your work or school mailbox to Outlook for Mac allows you to integrate your professional communications into a unified interface seamlessly. Thankfully, the process is usually straightforward, relying on clever server technologies to find the right settings automatically.
Before diving into the steps, it's helpful to understand the difference between the Exchange server and the Outlook client. Exchange is the backend system managing the data, while Outlook is the application you use to access it. Outlook for Mac primarily connects to specific Exchange Client Access services on the server to retrieve your mail, calendar, and other information. The magic behind automatic setup often involves Autodiscover, so understanding how Autodiscover configuration on the server works can provide context, especially if you encounter issues.
Let's get your Exchange account set up!
Prerequisites
Generally, you only need two things:
Your full Exchange email address (e.g., yourname@yourcompany.com)
Your password for that account.
In most modern Exchange environments, Outlook for Mac can figure out the rest automatically using Autodiscover.
Adding Your Exchange Account (Automatic Setup)
This is the most common and easiest method:
Open Outlook for Mac.
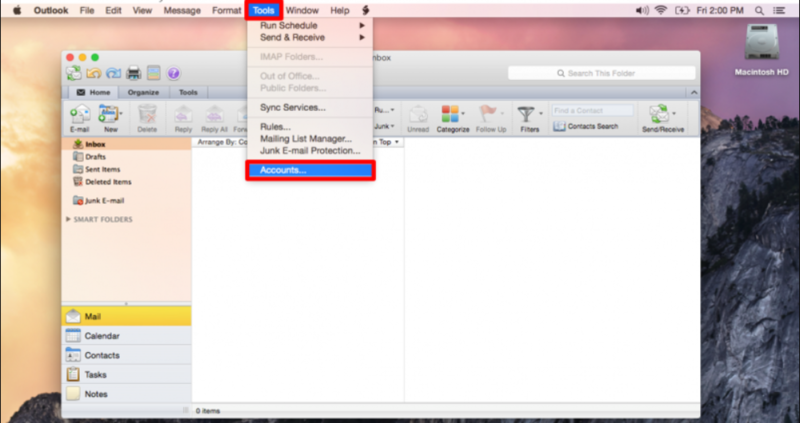
If this is the first account you're adding, you might be prompted automatically. If not, go to the Tools menu and select Accounts.

Alternatively, you can click Outlook in the menu bar, then Preferences, and then Accounts.
In the Accounts window, click the plus (+) sign in the bottom-left corner and select New Account....
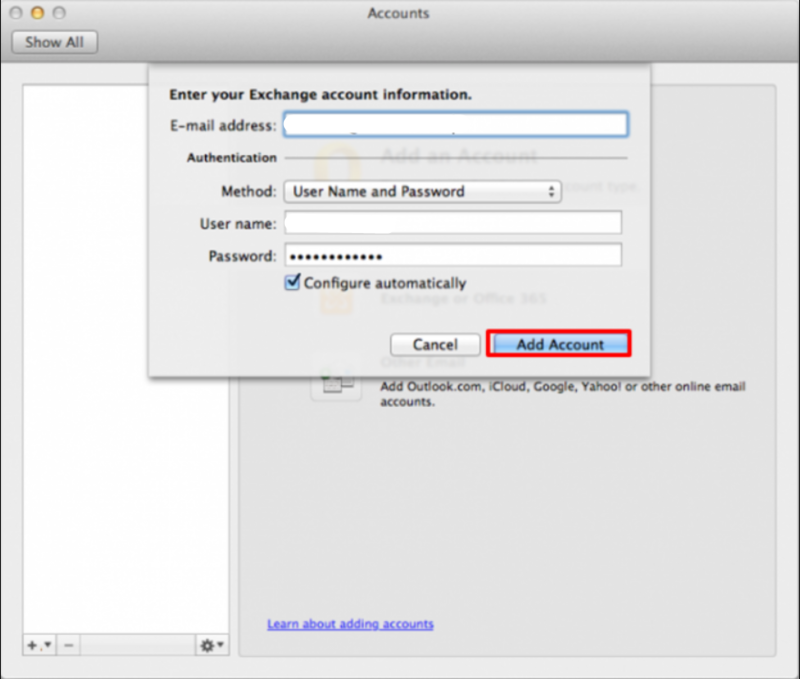
Enter your full Exchange email address in the provided field and click Continue.

Outlook will now attempt to detect your server settings using Autodiscover.
You will likely be prompted for your password. Enter it and check the box to save it to your keychain if desired. You might also see a prompt asking for permission to allow Exchange to configure settings – accept this.
In some cases, especially with Microsoft 365 hosted Exchange, you might be redirected to your organization's sign-in page (often showing your company logo). Complete the sign-in process, which might include multi-factor authentication (MFA).
Once authenticated, Outlook should automatically configure the account settings. You'll see a summary screen. Click Done.
Your Exchange mailbox will appear in the folder list on the left side of the main Outlook window, and your emails, calendars, and contacts will begin synchronizing. This might take a few minutes, depending on the size of your mailbox.
Manual Setup (If Automatic Fails)
If Autodiscover doesn't work (which can sometimes happen due to network configurations or server setup), you might need to enter settings manually.
Follow steps 1-4 above.
If Outlook cannot find the settings after you enter your email address, it might give you an option to choose the provider or configure it manually. Look for an option like "Not Exchange?" or similar, which might reveal more fields.
You may need to provide:
Username: Often your full email address, but sometimes a domain\username format. Check with your IT department.
Password: Your account password.
Server Address: The specific address for your Exchange Web Services (EWS) endpoint (e.g., outlook.yourcompany.com or mail.yourcompany.com). Your IT admin can provide this.
Note: Manual configuration is becoming less common with modern Exchange and Outlook versions but is still occasionally necessary.
Common Issues?
If you're having trouble connecting, it could be due to various factors. While basic checks include verifying your password and network connection, more complex issues might involve server-side configurations. For persistent problems, exploring guides on troubleshooting Outlook connection problems or investigating potential Autodiscover or certificate issues might offer solutions, though often, consulting your IT department is the quickest route.
Conclusion
Adding your Exchange Server mailbox to Outlook for Mac is typically a simple process, thanks to Autodiscover. Once set up, you gain full access to your email, calendar, contacts, and tasks directly within the native Mac application, keeping your professional life organized and accessible. For more useful tips on Exchange Server, bookmark the Exchange MVP Tips Blog.